REVIEW · TOKYO
Chopstick Making Workshop in Ginza
Book on GetYourGuide →Operated by 銀座箸 · Bookable on GetYourGuide
Your souvenir starts as raw wood. In central Ginza, you’ll plane, sand, oil, and finish your own pair of chopsticks, with 24 wood options to shape the feel and look. The catch: it’s real handwork, so you’ll use arm strength, and upgrades like better wood or engraving cost extra.
I especially like that this isn’t a pretend craft. You pick the material, handle the tools, and leave with chopsticks you’ll actually use at home. I also appreciate the English-speaking staff support, which makes the technique feel doable rather than mysterious.
It’s also a one-hour format, so you’ll want to focus and listen. If you choose the trickier specialty woods or try to go super detailed with engraving, plan on paying attention and taking your time with the sanding.
In This Review
- Key things to know before you go
- Entering the Ginza Workshop: Where This Craft Fits in Tokyo
- Your 1-Hour Chopstick Build: What Happens Step by Step
- 1) Choose your wood and length
- 2) Set the pieces and plane the surface
- 3) Sand the tips and corners
- 4) Apply oil for a polished finish
- 5) Take the chopsticks home the same day
- Optional: laser engraving of your name or phrase
- Wood Choices: Free Types, Upgrades, and How to Decide
- Tools, Guidance, and English Help That Actually Keeps You Moving
- Laser Engraving: Making the Chopsticks Feel Like Yours
- Price and Value in Ginza: What Your $25 Covers
- Who This Workshop Suits—and Who Might Want to Adjust Expectations
- Great fit if you:
- Consider skipping or choosing easier materials if you:
- Practical Tips for Better Results (and Less Stress)
- Start confident, but don’t rush the plane
- Sand like you care about your future self
- Bring a small comfort aid
- Choose the wood with your patience level in mind
- Decide engraving words early
- Should You Book This Chopstick Making Workshop in Ginza?
- FAQ
- How long is the chopstick making workshop?
- What is included in the experience price?
- Can I choose from different types of wood, and are upgrades extra?
- Is laser engraving available, and what does it cost?
- Do you provide English-speaking support?
- Is it wheelchair accessible, and are there age limits?
Key things to know before you go
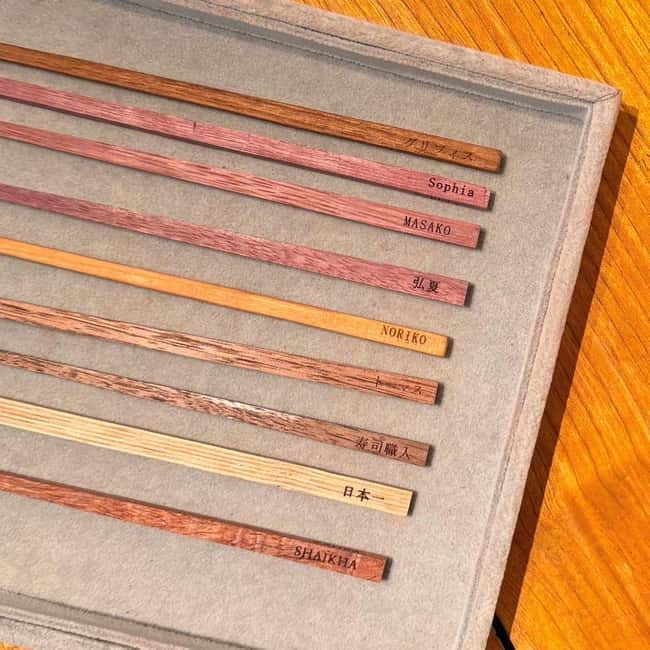
- 24 wood types plus two lengths lets you tailor your pair from the start
- Planing, sanding, and oil are the core steps, with tools and materials provided
- Real technique, not a hands-off demo means you earn the finished result
- Optional name or phrase laser engraving adds personal meaning
- English-speaking staff help you keep going even if you’re new to woodworking
- Same-day take-home turns the workshop into a practical souvenir
Entering the Ginza Workshop: Where This Craft Fits in Tokyo
Ginza is an easy area to justify an indoor activity. It’s central, walkable, and you can tuck a one-hour workshop into a shopping or sightseeing day without burning half your schedule.
The meeting point is 2-9-13 Ginza, Chuo-ku, Tokyo, so do yourself a favor and confirm the exact address on a map before you leave. Even with good directions, Ginza can feel like a puzzle because streets and building numbering can change quickly. Arriving a bit early is smart because the workshop runs on tight time blocks.
This experience is run by a woodworking company, and that matters. It’s not just a craft studio throwing tools in your hands. They handle wood selection and processing in-house, and the workshop centers on how the wood behaves and how the finish looks once you oil it.
You can also read our reviews of more tours and experiences in Tokyo.


Your 1-Hour Chopstick Build: What Happens Step by Step
This class is built like a mini woodshop lesson. The pacing is designed so you can finish a pair the same day, but you still do the real steps yourself.
1) Choose your wood and length
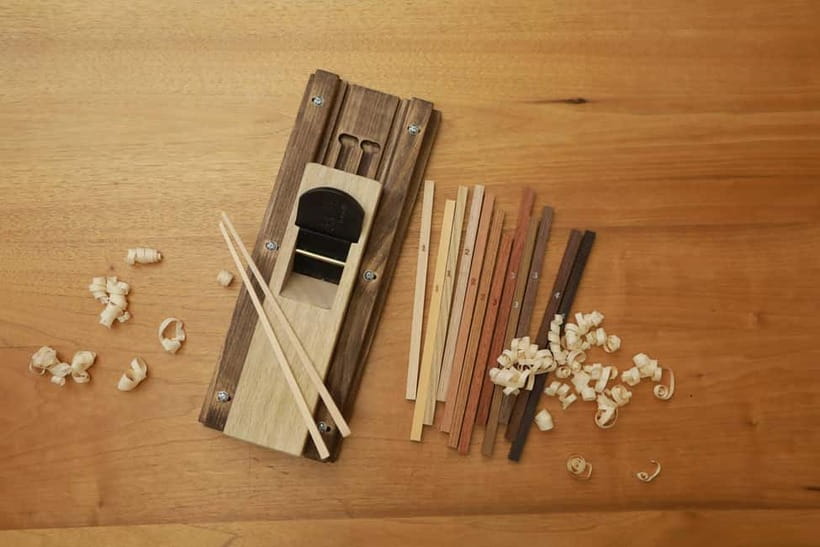
You start by selecting your chopsticks from 24 types of wood and two different lengths. That choice affects everything you feel during the planing step and how polished the final look turns out after oil.
A useful mindset: if you’re nervous about tools, choose a wood that you think will be forgiving. If you want a challenge and a specific look, go with something harder or more distinctive, knowing it may take more strength to shape.
2) Set the pieces and plane the surface
Next, you place the chopsticks on the stand and use a plane to shave the wood. People describe this as requiring real pressure, and that’s accurate. You’re not just smoothing—it’s shaping the profile. The upside is you get a clear sense of progress fast. The other upside: once you commit to even strokes, the chopsticks start to look like chopsticks rather than blocks.
3) Sand the tips and corners
After planing, you switch to sandpaper. This is where your work becomes “finished.” You’ll smooth the tips and corners, aiming for that clean, hand-held comfort you expect from chopsticks.
The practical trick here is to slow down during the sanding stage. Even if you feel confident with the plane, uneven corners or a rough tip can show once you add oil.
Also, expect a small learning curve. Some people find it helpful to keep track of orientation so the finished shape is consistent from one chopstick to the other.


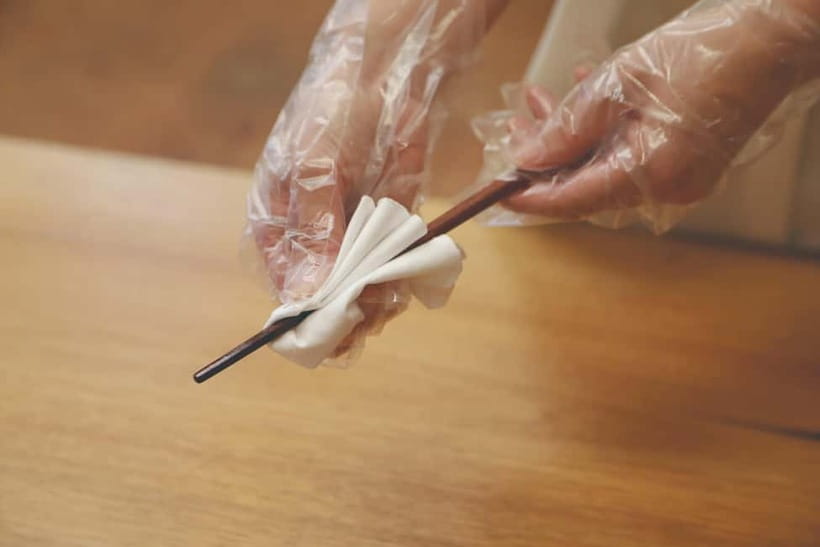
4) Apply oil for a polished finish
Then comes the oil coat. This step is quick but satisfying: it brings out the wood’s character and gives that smooth, polished feel. Since this workshop focuses on the finish, oil isn’t just decoration—it’s part of how the final chopsticks become ready to use at home.
5) Take the chopsticks home the same day
You can take your finished chopsticks with you on the day of the workshop. For many people, this is the best part: you’re not waiting for shipping, and you aren’t stuck with a souvenir that feels like a decoration-only item.
Optional: laser engraving of your name or phrase
If you want personalization, you can add engraving. Your name or a favorite phrase can be engraved in Japanese or in your native language. The laser method is designed to put gentle stress on the wood, so the marking looks clean without turning your chopsticks into a messy experiment.
The engraving is an extra charge.
Wood Choices: Free Types, Upgrades, and How to Decide
The workshop includes 5 types of wood for free. The remaining 19 types are higher grade, and those come with an additional charge.
That means the real “pricing moment” happens when you start choosing wood—not when you pay for the basic experience.
Here’s how I’d decide, based on the way this kind of class usually goes and what people report from the workshop:
- If you want to keep costs simple, choose one of the free woods. You’ll still do all the work—planing, sanding, oil—and you’ll still get a memorable, usable souvenir.
- If you’re chasing a specific look or wood character, upgrade. People who upgrade often say it’s worth it, especially when they want the chopsticks to feel special rather than standard.
- If you pick a tougher wood, expect it to take more strength and patience. One example from the experience: olive wood can be more challenging to work with, but the final result can still be satisfying.
If you’re unsure mid-class, it helps to ask the staff what they think will be manageable for your comfort level. Since English-speaking support is included, you can get quick guidance on what to expect from the tool work.
Tools, Guidance, and English Help That Actually Keeps You Moving

The workshop provides tools and materials, including the plane, sandpaper, and oil. You’re not expected to bring equipment or know woodworking jargon.
What makes a difference is the coaching quality. The staff include people who can speak English and Japanese, and an included guide fee (1,000 yen) is part of what you’re paying for.
In real terms, that support shows up when:
- you need help applying the right pressure with the plane
- you get stuck during sanding and want the corners to look consistent
- you’re trying to understand how to get the shape and smoothness you want
Also, this class can run with multiple participants at once. It’s busy at times, but the general experience is that staff stay attentive and help you continue rather than leaving you alone with tools and frustration.
Laser Engraving: Making the Chopsticks Feel Like Yours
A name engraved on chopsticks turns a nice craft into something personal you’ll use for years. If you’re the type who keeps souvenirs for daily life rather than shelf life, engraving is a big win.
The experience offers engraving of your name or a favorite phrase, in Japanese or your native language. You also have the option to engrave what you want—just be ready to think about what you want before the final steps start.
Cost note: engraving has an additional fee, listed as 1,100 yen. Some people report paying for engraving as a separate add-on, so it’s worth budgeting for it if personalization matters to you.
And one more thing I appreciate: the engraving method is described as using a high-performance laser that puts gentle stress on the wood. In plain terms, it’s meant to look crisp without wrecking the surface you just worked so hard to smooth.
Price and Value in Ginza: What Your $25 Covers
The base price is $25 per person for a one-hour workshop.
What feels like real value here is that the price isn’t only for the activity. It covers:
- the chopstick-making workshop
- tools and materials
- wood selection options (with 5 types free)
- English-speaking staff support
- an included guide fee
So you’re not paying for a quick “try it for fun” moment. You’re paying for an entire, structured process that ends with something practical.
Where the cost can rise is also straightforward:
- choosing higher grade wood beyond the free options
- adding engraving
If you’re on a tight budget, the smart move is to pick one of the free woods and skip engraving. You’ll still get the full planing/sanding/oiling process and a take-home souvenir. If you’re budgeting for a meaningful gift, then upgrading wood and adding engraving is where you’ll feel the difference.
Who This Workshop Suits—and Who Might Want to Adjust Expectations
This experience is a hands-on craft. That’s the point. It’s not a passive activity, and it does require effort with the plane and focus during sanding.
Great fit if you:
- want a hands-on souvenir you’ll actually use
- like practical activities more than watching demos
- enjoy personalizing gifts (names, phrases)
- want something indoors in Tokyo that doesn’t turn into a half-day commitment
This is also a fun fit for families and mixed ages. The workshop is described as suitable for a wide adult range, with limits at the low and high ends.
Consider skipping or choosing easier materials if you:
- don’t like using hand tools
- expect woodworking to feel effortless
- want a zero-effort activity after a long day
There are stated limits: children under 3 aren’t suitable, and people over 70 aren’t suitable. Wheelchair accessibility is listed as available, which is helpful if mobility is a concern, but you’ll still be using tools that may require assistance or staff guidance depending on your situation.
Practical Tips for Better Results (and Less Stress)
If you want your chopsticks to look smooth and feel right in hand, these are the habits that pay off during the workshop.
Start confident, but don’t rush the plane
The plane step is where shaping happens. People say it takes strength to shave the wood, so don’t try to muscle it wildly. Instead, use steady, controlled pressure and aim for consistency.
Sand like you care about your future self
Sanding the tips and corners is where your chopsticks go from rough to comfortable. Even if time feels tight, slowing down here usually makes the oil finish look cleaner.
Bring a small comfort aid
If you have long hair, tie it back. One practical suggestion from participants is simply to use a hair tie, because sanding and planing can get sporty fast.
Choose the wood with your patience level in mind
If this is your first time, the free wood options are a fine starting point. If you’re comfortable and want the best-looking wood character, then upgrade.
Decide engraving words early
If you’re adding a name or phrase, decide what you want before you’re in the finishing stage. The staff can help, but you’ll get a smoother flow if your message is already clear.
Should You Book This Chopstick Making Workshop in Ginza?
Book it if you want a real, take-home craft that feels worth the time. The workshop gives you the full chain—wood selection, planing, sanding, and oil finish—and you can add engraving to make it genuinely personal.
Choose this workshop even if you’re not a “craft person,” as long as you’re okay with handwork. It’s one hour, it’s central to Ginza, and the English-speaking staff support makes it easier to follow the steps without guesswork.
Skip or scale back (free wood only, no engraving) if:
- you want a totally effortless activity
- you’re worried about arm effort
- you don’t want add-on costs to pop up when choosing better wood
If your priority is a souvenir that you’ll use at the dinner table rather than store in a drawer, this is a strong bet.
FAQ
How long is the chopstick making workshop?
The workshop runs for 1 hour.
What is included in the experience price?
The experience includes the chopstick making workshop, tools and materials, 24 wood choices with 5 free types, and English-speaking staff.
Can I choose from different types of wood, and are upgrades extra?
Yes. You can choose from 24 types of wood. Five types are free, and the other higher grade woods cost extra.
Is laser engraving available, and what does it cost?
Yes. You can engrave your name or a favorite phrase. The additional engraving fee is 1,100 yen.
Do you provide English-speaking support?
Yes. English-speaking staff are available, and the workshop staff can also speak Japanese.
Is it wheelchair accessible, and are there age limits?
Wheelchair accessibility is listed as available. The experience is not suitable for children under 3 and people over 70.